Dev Blog

스크립트 & 소스코드 공유

실무에서 유용하게 쓰는 스크립트와 코드 조각을 블로그 게시판으로 저장하고 공유합니다.

26건의 글

PHP로 JPG 이미지를 WEBP 형식으로 변환하기 (imagick)

PHP의 imagick 확장을 이용해 JPG·PNG 이미지를 WEBP 형식으로 변환하는 방법이다. GitHub에서 제공하는 확장을 설치하고 변환 예제 코드를 사용한다. 단일 CGI 프로세스로 수만 번 변환해도 메모리가 늘지 않아 안정적이며, 200KB 이하 이미지는 약 0.2초 안에 변환되지만 대용량 파일은 시간이 오래 걸려 실시간 변환에는 부적합하다.

imagemagick支持webp,使用imagick即可,不需编写此扩展 下载地址 https://github.com/godlovesdog/webp 使用

/*
* 将JPEG/PNG 图片内存转为webp
* 纯内存操作
*/
$opts = getopt('f:');
$blob = file_get_contents("/home/lvbenwei/".$opts['f']);
$res = image2webp($blob);
$arr = explode('/',$opts['f']);
file_put_contents("/home/lvbenwei/".$arr[count($arr)-1].".webp",$res);//纯内存操作

稳定性测试

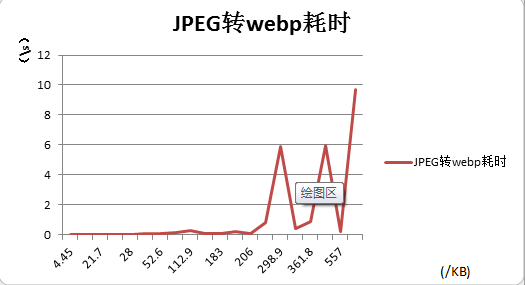
单CGI进程几万次JPEG图片转WEBP操作,消耗内存并未增长,可以认为无内存泄露 JPEG转webp

php 把jpg格式的图片转为webp格式
图片字节数在200KB以内时,图片格式转换耗时基本在0.2s内
图片字节数>200KB时,格式转换耗时不稳定,有时达近10s PNG转WEBP
php 把jpg格式的图片转为webp格式
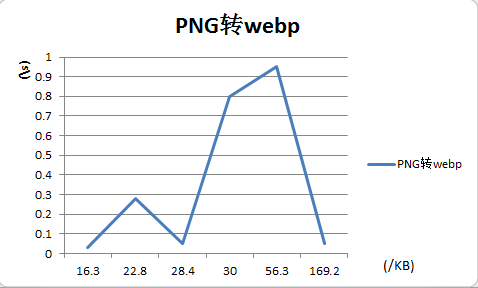
有的200KB以内的PNG转换webp耗时竟达1s

格式转换性能不尽如人意,不建议进行在线格式转换

그누보드 원하는 게시판만 선택해 최근게시물 노출하기

그누보드 latest.lib.php 파일 하단에 함수를 추가해, 사이트 전체가 아닌 원하는 게시판만 선택적으로 최근 게시물을 노출시키는 방법이다. 최근 게시물을 가져올 게시판 테이블 목록을 지정하고 최신글을 조회해 제목·작성일 등 목록으로 출력하는 PHP 함수 코드를 제공한다.

latest.lib.php 하단에 아래 함수를 추가하시면됩니다.

// $bo_tables 테이블들 사이 콤마(,) 단위로 구분해서 넣을 것, 콤마 사이에 공백 없이 (ex aaa,bbb,)
function latest_all($skin_dir='', $bo_tables, $rows=10, $subject_len=40, $cache_time=1, $options=''){
global $g5;

if (!$skin_dir) $skin_dir = 'basic';

if(preg_match('#^theme/(.+)$#', $skin_dir, $match)) {
if (G5_IS_MOBILE) {
$latest_skin_path = G5_THEME_MOBILE_PATH.'/'.G5_SKIN_DIR.'/latest/'.$match[1];
if(!is_dir($latest_skin_path))
$latest_skin_path = G5_THEME_PATH.'/'.G5_SKIN_DIR.'/latest/'.$match[1];
$latest_skin_url = str_replace(G5_PATH, G5_URL, $latest_skin_path);
} else {
$latest_skin_path = G5_THEME_PATH.'/'.G5_SKIN_DIR.'/latest/'.$match[1];
$latest_skin_url = str_replace(G5_PATH, G5_URL, $latest_skin_path);
}
$skin_dir = $match[1];
} else {
if(G5_IS_MOBILE) {
$latest_skin_path = G5_MOBILE_PATH.'/'.G5_SKIN_DIR.'/latest/'.$skin_dir;
$latest_skin_url  = G5_MOBILE_URL.'/'.G5_SKIN_DIR.'/latest/'.$skin_dir;
} else {
$latest_skin_path = G5_SKIN_PATH.'/latest/'.$skin_dir;
$latest_skin_url  = G5_SKIN_URL.'/latest/'.$skin_dir;
}
}
$list = array();
$sql_common = " from {$g5['board_new_table']} a  where find_in_set(a.bo_table, '{$bo_tables}')";
$sql_common .= " and a.wr_id = a.wr_parent ";
$sql_order = " order by a.bn_id desc ";
$sql = " select a.* {$sql_common} {$sql_order} limit 0, {$rows}";
$result = sql_query($sql);
for ($i=0; $row=sql_fetch_array($result); $i++) {
$sql = " select * from {$g5['board_table']} where bo_table = '{$row['bo_table']}' ";
$board = sql_fetch($sql);
$tmp_write_table = $g5['write_prefix'] . $row['bo_table'];
$row2 = sql_fetch(" select * from {$tmp_write_table} where wr_id = '{$row['wr_id']}' ");
$list[$i] = $row2;
$list[$i] = get_list($row2, $board, $latest_skin_url, $subject_len);
$list[$i]['bo_subject'] = $row['bo_subject'];
$list[$i]['bo_table'] = $row['bo_table'];
}

ob_start();
include $latest_skin_path.'/latest.skin.php';
$content = ob_get_contents();
ob_end_clean();

return $content;
}
echo latest_all("스킨명", "게시판명1,게시판명2,게시판명3,게시판명4", 출력갯수, 글자수);

그누보드 업로드 이미지에 워터마크 일괄 적용하기

그누보드 게시판의 write_update.skin.php를 아래 소스로 교체하면 업로드되는 모든 이미지에 워터마크가 일괄 적용된다. PHP GD 함수로 원본 이미지 위에 워터마크를 합성하며, 함께 포함된 이미지 리사이즈 기능이 필요 없으면 주석 처리된 부분을 참고해 제거할 수 있다.

적용하고 싶은 게시판의 "write_update.skin.php"를 아래 소스로 바꾸시면 됩니다.

아래 소스는 이미지 리사이즈 적용 소스이니..원치 않으시면 주석달린곳을 참고 하시면 됩니다.

<?
// 자신만의 코드를 넣어주세요.
$data_path = $g4[path]."/data/file/$bo_table";
$thumb_path = $data_path.'/thumb';
$sql2=" select * from $g4[board_file_table] where  bo_table = '$bo_table' and wr_id = '$wr_id' order by bf_no asc";
$results2 = sql_query($sql2);
for ($d=0; $row2=sql_fetch_array($results2); $d++)  {
if ($_FILES[bf_file][name][$d]){
$file = $data_path .'/'. $row2[bf_file];
if (preg_match("/\.(jp[e]?g|gif|png)$/i", $file)) {
$size = getimagesize($file);
if ($size[2] == 1) $src = imagecreatefromgif($file);
else if ($size[2] == 2) $src = imagecreatefromjpeg($file);
else if ($size[2] == 3) $src = imagecreatefrompng($file);
else break;
$rate = $board[bo_image_width] / $size[0]; // 리사이즈를 원치않으면 여기서부터~~~
$height = (int)($size[1] * $rate);
if ($size[0] > $board[bo_image_width]){
@unlink($data_path.'/'.$row2[bf_file]);
$dst = imagecreatetruecolor($board[bo_image_width], $height);
imagecopyresampled($dst, $src, 0, 0, 0, 0, $board[bo_image_width], $height, $size[0], $size[1]);
imagejpeg($dst, $data_path.'/'.$row2[bf_file], $board[bo_2]); //혹 업로드 이미지 깨지면 여긴 주석처리하시고 바로 아래 껄 이용하세요..
// imagepng($dst, $data_path.'/'.$row2[bf_file], $board[bo_2]); //주석 해제
chmod($data_path.'/'.$row2[bf_file], 0606);
$temp = @getimagesize(addslashes($file));

} // 리사이즈를 원치않으면 여기까지 삭제 & 주석처리하면 됨.
$wmFile = $g4[path]."/img/logo_mark.gif"; // 워터마크 이미지 주소
$wmImg  = imageCreateFromGIF($wmFile);
$size = getimagesize($file);
if ($size[2] == 1)  $jpegImg = imagecreatefromgif($file);
else if ($size[2] == 2)  $jpegImg = imagecreatefromjpeg($file);
else if ($size[2] == 3)  $jpegImg = imagecreatefrompng($file);
else break;
$wmX=imageSX($jpegImg) - imageSX($wmImg);
$wmY=imageSY($jpegImg) - imageSY($wmImg);
imageCopyMerge($jpegImg, $wmImg, $wmX, $wmY, 0, 0, imageSX($wmImg), imageSY($wmImg), 90);
ImageJPEG($jpegImg, $file, 90);
}
}
}
?>

PHP strtotime·date로 이번 달·지난 달·다음 달 날짜 구하기

PHP의 strtotime과 date 함수로 이번 달, 지난 달, 다음 달의 시작일과 말일을 구하는 방법이다. 월 첫날에 한 달을 더하고 하루를 빼는 방식으로 말일을 계산하며, date()가 2014-02-01 같은 값이나 2014-13-01 같은 잘못된 월을 자동 보정하는 특징을 활용한다. 연말 12월 처리와 예제 코드를 함께 담고 있다.

因为工作需要需要获取上个月、下个月、本月的日期,特从网站找到了实现代码,特分享下,方便需要的朋友

今天写程序的时候,突然发现了很早以前写的获取月份天数的函数,经典的switch版,但是获得上月天数的时候,我只是把月份-1了,估计当时太困了吧,再看到有种毛骨悚然的感觉,本来是想再处理一下的,但是一想肯定还有什么超方便的方法,于是找到了下面这个版本,做了一点小修改。

获取本月日期:

复制代码 代码如下:

function getMonth($date){
$firstday = date("Y-m-01",strtotime($date));
$lastday = date("Y-m-d",strtotime("$firstday +1 month -1 day"));
return array($firstday,$lastday);
}

$firstday是月份的第一天,假如$date是2014-2这样的话,$firstday就会是2014-02-01,然后根据$firstday加一个月就是2014-03-01,再减一天就是2014-02-28,用date()和strtotime()真是太方便了。

获取上月日期:

复制代码 代码如下:

function getlastMonthDays($date){
$timestamp=strtotime($date);
$firstday=date('Y-m-01',strtotime(date('Y',$timestamp).'-'.(date('m',$timestamp)-1).'-01'));
$lastday=date('Y-m-d',strtotime("$firstday +1 month -1 day"));
return array($firstday,$lastday);
}

上月日期需要先获取一个时间戳,然后在月份上-1就OK了,超智能的date()会把2014-0-1这种东西转换成2013-12-01,太爽了。

获取下月日期:

复制代码 代码如下:

function getNextMonthDays($date){
$timestamp=strtotime($date);
$arr=getdate($timestamp);
if($arr['mon'] == 12){
$year=$arr['year'] +1;
$month=$arr['mon'] -11;
$firstday=$year.'-0'.$month.'-01';
$lastday=date('Y-m-d',strtotime("$firstday +1 month -1 day"));
}else{
$firstday=date('Y-m-01',strtotime(date('Y',$timestamp).'-'.(date('m',$timestamp)+1).'-01'));
$lastday=date('Y-m-d',strtotime("$firstday +1 month -1 day"));
}
return array($firstday,$lastday);
}

下月日期的代码看起来比较长一点,因为date()转不了类似2014-13-01这种东西,它会直接回到1970,所以前面需要处理一下12月的问题,除了12月就直接月份+1就OK啦。

总得来说,还是很方便的,日期函数太强大了

PHP 엑셀 다운로드 시 숫자 앞자리 0이 사라지지 않게 하기

PHP에서 웹페이지 데이터를 엑셀 형식으로 내보낼 때 셀의 앞자리 0(예: 010...)이 사라지는 문제를 해결하는 방법이다. MIME 타입을 application/vnd.ms-excel로 설정하고, 데이터를 감싸는 td 태그에 vnd.ms-excel.numberformat:@ 스타일을 지정하면 셀이 텍스트 형식으로 출력되어 0이 유지된다. 날짜·숫자·통화·퍼센트 형식도 정리했다.

“首先,我们了解一下excel从web页面上导出的原理。

当我们把这些数据发送到客户端时,我们想让客户端程序(浏览器)以excel的格式读取它,

所以把mime类型设为:application/vnd.ms-excel,当excel读取文件时会以每个cell的格式呈现数据,如果cell没有规定的格式,则excel会以默认的格式去呈现该cell的数据。

这样就给我们提供了自定义数据格式的空间,当然我们必须使用excel支持的格式。

下面就列出常用的一些格式:

1) 文本:vnd.ms-excel.numberformat:@

2) 日期:vnd.ms-excel.numberformat:yyyy/mm/dd

3) 数字:vnd.ms-excel.numberformat:#,##0.00

4) 货币:vnd.ms-excel.numberformat:¥#,##0.00

5) 百分比:vnd.ms-excel.numberformat: #0.00%

这些格式你也可以自定义,比如年月你可以定义为:yy-mm等等。

那么知道了这些格式,怎么去把这些格式添加到cell中呢?很简单,我们只需要把样式添加到对应的标签对(即闭合标签)即可。

如,给标签对添加样式,如下:<td style="vnd.ms-excel.numberformat:@">410522198402161833</td>


Let's create something great together.

프로젝트 문의 및 견적 요청은 언제든 환영합니다.